

I have a sore coccyx as I write (the medical profession being what it is, you can’t say “sore coccyx”, it’s gotta be “coccydynia”) as a result of a bicycle seat gently clouting me on the backside during an otherwise very enjoyable ride around the lakes in Canberra after the LCA2005 Linux conference.
The only reliable way to encourage that particular chunk of human to heal is to give it as much rest as possible. Sitting is not rest for a coccyx, and while standing up is not too hard on it, there’s only so much standing up one can do. Encouraging it to heal is a good idea, else it simply won’t. Pain for the rest of your life, or pain-killers and their side-effects, or surgery. Nice range of choices.
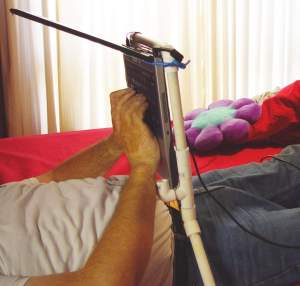
Standing up or lying down don’t make for easy computing. Yes, you can use a laptop but you have to prop it up somehow. Lots of pillows may work, but in a warm climate they cause problems of their own (ie, you melt, and the pillows may block airflow to your CPU fan). Folding your legs up will also work, but then you’re effectively sitting anyway, and the positioning is a tad awkward. When I asked furniture shops about this, they looked at me kinda funny – when I ’phoned them, you could hear them looking funny.
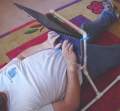
Aaaaaanyway, it quickly became obvious that if I wanted my laptop to levitate, I had to rig it up myself. I thought about brackets, and about wood. We have an excellent ex-neighbour who does cabinet-making for a living (although his primary training is in psychology), but this would be very fiddly and he’s already done a lot for us. So...
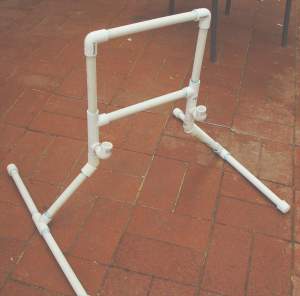
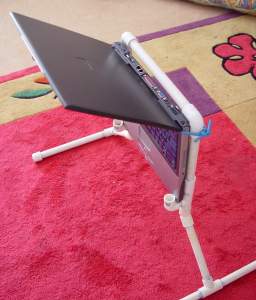
PVC piping looked about right. Tough enough to hold a laptop relatively still, no sharp edges, relatively easy to work with. So I turned about 3 meters of 15mm (“half-inch”) PVC pipe, 6x tee pieces, 2x 45-degree elbows, 4x 90-degree elbows and 4x end-caps and a length of Cat5 cable (although an “occy strap” (elastic cord with wire hooks at each end, Kiwis call them “bungee cords”) would possibly be better) into the Lappyvator.
No patents pending, AFAICT; the idea is so obvious that I’d be amazed if anyone could sustain a patent on it.
The total cost of parts is (retail) about AUD$30, not including glue (“Pipe Cement” or “Plumb-Weld” of which you need very little). Of this, nearly $10 is PVC pipe in short lengths, which many plumbers or building sites or salvage yards would be willing to give you as off-cuts.
Up here in the far northern suburbs of Perth, a good place to get the fittings is Controlled Irrigation Supplies in 7 Delage Street, Joondalup. Delage Street is inside the Winton Road loop to the west of Lakeside Shopping Centre.
CIS have a wider range of fittings than the larger suppliers, are typically cheaper, know more about the parts and a chap named Barry Thomas had the patience to find them all for me. They also do pumps, timers, sprinklers and all manner of irrigation esoterica. They also do bores.
CIS have the good taste to host their website on Apache and in Australia, which has to count for something.
I built it at my own risk, it worked for me. If you build it or something like it you also do so at your own risk. This is not a design, it is an example, and it is not in any way warranted to be either functional or safe.
Your laptop may be crushed during construction or fall out of the frame and smash into a million pieces on the floor. Electric radiation from the CPU may fry your genitals. Your cat might become jealous of its position on your lap and exact terrible revenge (along the lines of “if I can’t have it all to myself...). You may fall asleep operating your laptop, develop “kangaroo paw”, a beer gut or myopia, get your finger stuck in a fitting, who knows?
So... you have been warned. Please use care and common sense, but if you fail in this endeavour it’s your problem, not mine.
The PVC pipe has a very limited range of fittings available, specifically tees, right- and 45°-angles, joins, and adaptors to other kinds and size of piping. The fittings each use what for this scale of application is a substantial amount of length of pipe to achieve their goals. I had to shorten the flanges on the fittings that the laptop’s front edge rests on to get them close enough together.
Each type of laptop is a different size, with different bits sticking out in different places, so there’s not much point in drawing up and publishing exact dimensions. You might be fatter or have shorter arms than me, or lie in a narrower bed, and each such factor changes the design parameters. Thankfully, working out variations on the design by trial and error is not too difficult (at least, until you add the glue).
Since the PVC has some give in it, wedging the laptop in reasonably firmly should be safe and prevents it from rattling around while you type or use the mouse-pad.
A hacksaw or fretsaw. A vice would be handy but I got by without one. PVC pipe glue. Maybe a ruler. Work space with plenty of fresh air (for the glue).
I’d like to start with “measure up...” but what I actually did was eyeball the sizes, then once I was sure it was correct I’d cut another one the same length since the device is symmetrical and there’s two of everything. Guess long, since it’s easier to trim than to extend. Start with the longer pieces since if you get any wrong you can chop them up to suit the shorter pieces.
Push the pieces together without gluing them. The resulting structure is strong enough to test (carefully) sans glue. The usual pipe cement sets very quickly (5-10 seconds), so you might like to literally do a few last-minute dry runs with the fiddly bits before trying to glue them for real.
The order I used was: fit a pipe across the back of the laptop, with a tee on each end with the tees aligned with the edges of the back.
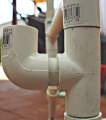
Fit a short pipe to a tee and the cross-piece of another tee to that, with the vertical at right angles to the pipe. Butt this up against the front edge of the laptop, put a short pipe in it and fit an elbow to that so it curls up towards the keyboard and sits tightly against the laptop. My laptop was thin enough that this was too loose, so I sawed a thin slice off each of the elbow and the arm of the tee. This is fairly safe for the hooks since the weight is falling directly across the joint and resting half on one side of it, but would not work so well at points below it (e.g. the 45° elbows).
Fit a pipe up the side of the laptop, so an elbow protrudes just a little beyond the back edge. Cut duplicates of the above two pipes and finish the rectangle. Put two very short pipes into the free ends of the (possibly sawn-off) tees and fit the 45° elbows to those. Fit about 20cm of pipe to each (more if you want to raise the laptop further – try this out on the bed you’re going to use, not the floor, because you sink into a bed – but watch out for making it unmanageably wide), and the arm of a tee to the end of each. Fit about 25-30cm of pipe to the laptop side of each tee crossing and an end-cap to that. Fit a short length (15-20cm) to the other side of the tee and end-cap that.
Try it out at this point – at first without the laptop – to make sure no lengths need to be changed.
Once you’re confident that it all fits, disassemble it into three sections at the hook-tees. Each section can be separately pulled apart, glued and aligned, then the three chunks assembled around the hooks in essentially one go. Take care to thump each pipe thoroughly into each joint, as your frame will look very odd if the joints set out of place.
To assemble the frame behind the laptop, it is more practical to do the last two joints in one go than to try to bend and stretch pipes to do one at a time. Add the hooks to the back frame, rotating them slightly to match the laptop if necessary. Use cling wrap on your laptop if getting pipe glue on it worries you. Then reattach the feet, then detach, glue and align each foot in turn, giving the first one about 20 seconds for its initial set before working on the second.
Give the whole assembly about ten minutes to set well, then tug on each joint a couple of times, firmly, to make sure that the glue wasn’t “shattered” by premature movement.
You’re done. Insert and bind laptop, arrange cushions, umbrella’ed drinks or grape-peeling team to suit and compute away.
Hold the mouse over any picture for a description. Click on any thumbnail for a larger (800 pixels maximum dimensions) image.
 |
 |
 |
 |
 |
 | ||
 |
 |
 |
 |
Full sized (up to 2560x2048 pixels) images available upon request.
Adding 45°elbows in the legs will narrow its stance a little at some cost in rigidity and lateral stability.
Using 20mm pipe will give you access to a slightly wider range of fittings and produce a stiffer, stronger result at the price of slightly bulkier fittings. One useful fitting is a 20mm-pipe-to-15mm-arm tee piece, to keep the size of the hooks down.
Gluing plastic strips across the sides of the hooks might add extra stability and safety.
Piano wire in place of the Cat5 will allow the laptop’s lid to close, but risks chafing.
Occy strap in place of the Cat5 would likely be much easier to detach, but may cause injury through carelessness or a broken strap.
A “butterfly” shaped back-frame would permit either a lower placement or more clearance below the laptop, or both, but would require more fittings (6 more 45° elbows) and be less inherently rigid.
An additional set of tees and elbows would allow a bracing pipe to be run from the back frame to the back foot (“ankle”, if you will) for extra rigidity.
Dressing a power cable (and possibly network cable for non-wireless connections) extender inside the pipes down one side would permit easier, less tangled connection and more freedom of movement.
Adding a LED inside each hook would make the keyboard easier to read at night.
Please mail text, links and/or photos relating to any improvements or alternative designs to lappyvator at cyberknights com au.
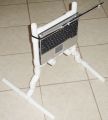
Here is Markos Fragoulopoulos’ implementation; if you can’t guess from the surname, Markos is from Greece (AKA Grecia). The smallest PVC pipe he could get was ~32mm diameter, and his laptop is lighter and easier to manage, with a 12" screen.
 |
 |
 |
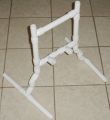 |
Markos left the legs unglued so that they could be rotated for flat storage. As far as my fractured Greek goes, I think his company name (βιβλιοσυνεργατική) translated to English would be “BookSynergy”.
Pelican Manufacturing are considering designing and manufacturing a more generalised and robust design. Email John “more Velcro” Bromberger (john at that domain) if you’re interested in buying one, to both encourage them and find out whether they have decided to go ahead and make it.
Pelican are Australian from keel to crowsnest. They make a wide range of pressure care, lifting and bracing items, living aids, safety appliances and too many other nursing, physiotherapeutic and hospital items to list, and sell them world-wide.
This page
is 100% web standards compliant and we’re proud of it, click
the icon to check for yourself. We are also as inclusive as possible:
it works with any
web browser.